If you want to start an online store, then you are in the right place.
Here we will be discussing, how to start an online store in simple steps with the help of WordPress and WooCommerce plugins.
These days more and more businesses are getting digitized because of the boom in the commerce industry as every person looking online to grab the things that are required from them.
So your online business presence is very much needed these days as it will generate extra passive income for your businesses.
Table Of Content
What you’ll need to build a store?
Building an online store these days and setting it up requires a little bit of your time.
If you want your store to be more and more functional then might be the resources will be more but here I have shared a few thongs that you require to start an online store:
- Domain Name: It is the address of your home where the audience will reach to look at your store through online mode. Let’s say bloggingsprout.com, is the domain name of my website. Similarly, you will also need a domain name where you can send your customers to buy.
- Web Hosting: This is the place where you will host your files, database, images etc. You can choose Bluehost wordpress hosting as it’s best for beginners. You get a FREE domain when you buy hosting from Bluehost.
- WordPress: This is the content management software to design, develop, and run your website without even need for any codes. After purchasing web hosting, you will get an option to install wordpress.
- Theme: This will be the identity of your store. The more attractive it is, the more conversion you will get from your audience. So it must be lightweight, fully customizable and easy to use.
- WooCommerce: This is the plugin that will increase the functionality of your store. It is very much required to run your online store.
It’s as simple as that.
Now let’s move one step forward and start setting up the store. I hope you have bought the domain name and web hosting.
You can buy the domain name from namecheap.com and web hosting from Bluehost.com or you can also buy web hosting from Bluehost and you will get a free domain for a year.
Now let’s move one step forward and start setting up the store.
Step 1 – How to Install WordPress?
Click on this special link that will direct you to the 70% discount page of the Bluehost. You can see it below.

Click on the “Get Started button” you will need to choose a plan available there and click “Select“. You will be asked to provide your domain name if you have one or create a new domain. You can create it right now or later also.
Now you have to provide basic details like name, address, and payment information. Just fill in all those and make your payment. As it is a managed wordpress hosting, your wordpress will automatically get installed.
If it is not then you can manually install WordPress by following this process.
To get started:
- Log in to your new Bluehost account.
- Go to the My Sites tab.
- Click the Create Site button in the top-right corner.

It will ask for your domain name, title or name of your store and tagline. Provide all those and you are good to go with that. It’s not rocket science.
Step 2 – How to Install WordPress Theme?
After installing WordPress on your site, you need to add a theme so that you can customize it and direct your customers to your store.
There are thousands of themes available on the WordPress directory but all those are not fully customizable and they will not attract the attention of customers eyes.
For that, I would suggest you install the Astra theme which is one of the most popular wordpress themes available in the market.

Astra is a freemium theme means you can certain features of it for free and for some other features you need to upgrade to the pro version of Astra.
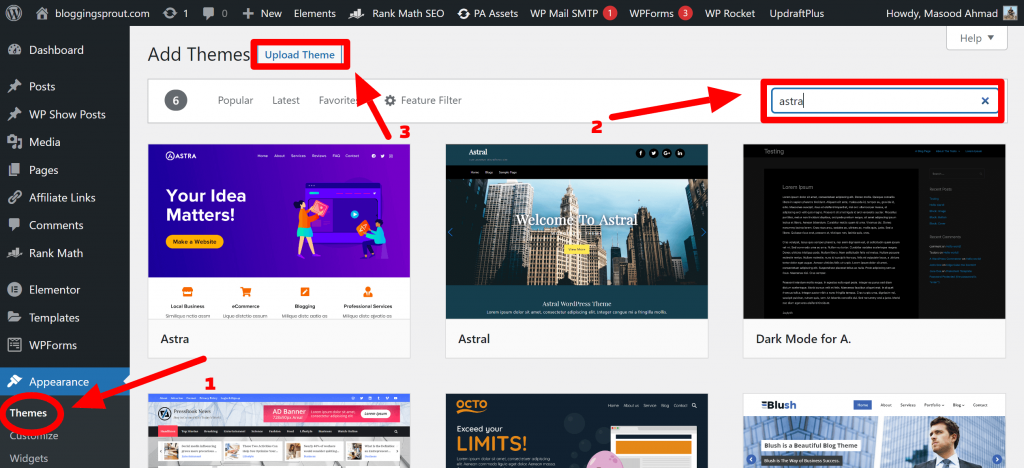
For adding the free version only go to Dashboard >> appearance >> theme and then search for Astra as shown with 2 and install and activate it.

But if you want to use the pro version, then visit Astra and purchase it. And download it to your computer and upload it as shown with pointer 3.
Step 3 – How to Install WooCommerce?
As discussed earlier about WooCommerce that it is the most popular online store builder in the market. The best part of WooCommerce is that it is fully customizable and comes with other features that are perfect for any store to go on full swing mode.
With the help of this plugin, you can add your store page, add to the cart page, checkout page and also receive payment worldwide in your account.
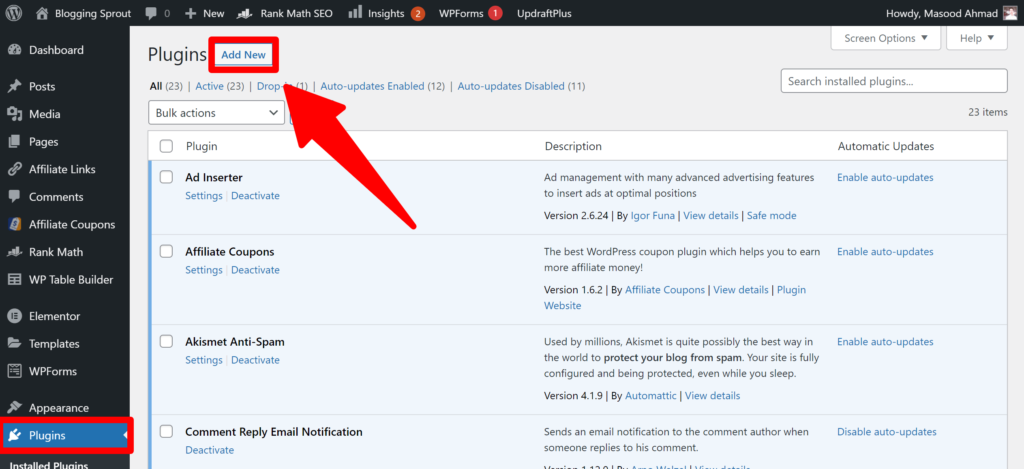
To add this plugin, just follow this process Dashbaird >> Plugins >> Add New and search for “WooCommerce” as shown below for this example.

You will get WooCommere at the top, just install it and activate it.
Now here comes the creation of a store. There are two ways to create a WooCommerce store:
1. First Method: You can quickly set up and launch the store by choosing one of the starter templates provided by Astra theme.

You can use any one started templates:
To install Starter Templates on your WordPress, follow this process Dashboard>> Plugins >> Add New from the plugins menu on the left-hand side.
Then, search for Starter Templates by Brainstormforce.
2. Second Method: You can build your store from scratch with the help of Astra Guide.
Step 4 – How to set up your online store?
We have already installed the WooCommerce plugin. All you need to do now is to activate the plugin. Just activate it and you will see an option on top in the WordPress dashboard to “Run the setup wizard“.
This we are doing to set up a few things like payment, currency and shipping information so that you can receive payment and make it a fully functional online store.
Once you, run the setup wizard, you will see the first option to provide the store address like this.

After providing, click on the “Continue” button. The next step is the shipping and tax information though you can change and edit it later on as well. WooCommerce will automatically calculate the tax rates added to your prices.

After completing this task, you will see an option to set up the payment methods for your store. There are various payment methods available WooCommerce are direct bank transfer, check payment, cash on delivery, PayPal, Stripe, and WooCommerce payments.

You are recommended to set up Paypal or stripe as these methods are used worldwide, so you will not face any difficulty in receiving the payment.
Now your store setup is done successfully. You can add products to your online store. For that follow this process.

You need to write the title, and the product description adds an image and make sure it’s SEO optimized.
There are many more settings that you will need while writing about the product. You can refer to the detailed guide from Astra by following this guide.
Conclusion: How to start an online store?
Hope you found this article useful and learned how to start an online store in less than 1 hour with the help of WordPress and WooCommerce.


